This page explains how to set up an iPhone or iPod touch running iOS 3.x to send and receive e-mail as a POP3 account. (You must have first created the mailbox on our servers.) (Setting up Email on your iPhone 3.0 as an IMAP Account.
If you have a current iPhone running iOS 4, view the main iPhone page instead.
The pictures below are from the iPhone 3 screens, but the iPad and iPod Touch screens are very similar.
1. Go to the mail setup screen.
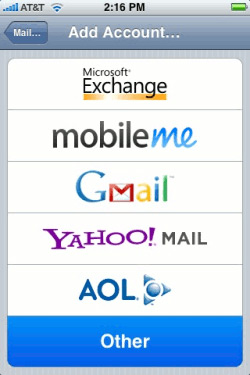
From the iPhone main screen, tap Settings > Mail, Contacts, Calendars >Choose OTHER > Add Mail Account . This makes the new account screen appear.

2. Choose the "Other" account type.
Tap Other at the bottom of the new account screen:
And then "ADD MAIL ACCOUNT":
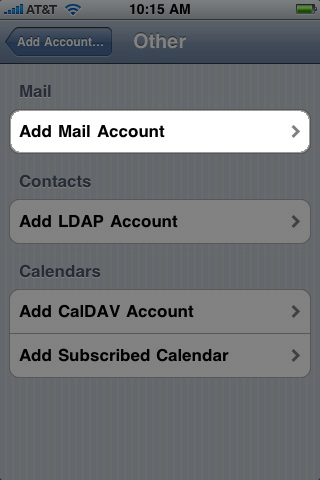
This makes the "Enter your account information" screen appear.
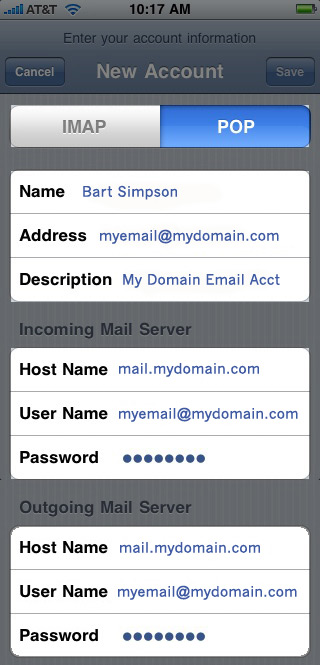
3. Enter the basic account information.
Type the following settings:
- Name: Your full name, such as "Bart Simpson"
- Address: Your e-mail address
- Password: Your e-mail password
The screen should look similar to this:
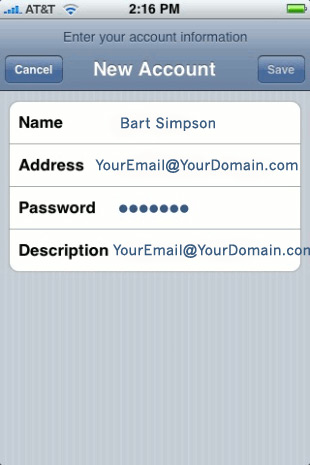
When you're finished, click Save in the upper-right corner of the screen.
4. Enter the remaining account information.
Choose POP at the top of the screen, then type the following settings under "Incoming Mail Server":
- Host Name: mail.mydomain .com
- User Name: Your FULL e-mail address, ie: bart@jubjub.com
- Password: Your e-mail password
And the same settings under "Outgoing Mail Server":
- Host Name: mail.mydomain.com
- User Name: Your FULL e-mail address, ie: bart@jubjub.com
- Password: Your e-mail password
The screen should look similar to this:
Some things to bear in mind:
- The "User Name" in both sections must be all lowercase.
- The "Outgoing Mail Server" user name and password are required, not optional. You need to enter your user name and password if you want to send mail.
- It's correct for the "Incoming Mail Server" and "Outgoing Mail Server" settings to be identical.
- The passwords you enter here must be the e-mail mailbox password (which is not necessarily the same as your master account (DirectAdmin or FTP) password).
When you're finished, click Save in the upper-right corner of the screen.
SERVER SETTINGS for WEB03 HOSTED EMAIL ACCOUNTS:
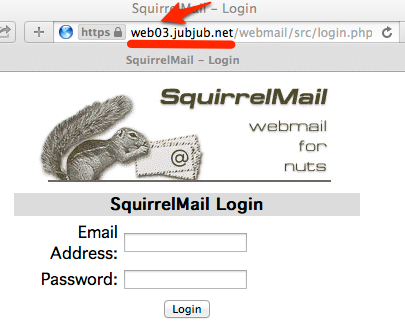
IF YOUR WEBMAIL URL RESOLVES to "http://web03.jubjub.net", then the settings are slightly different.
To check if your website is on web03, CHECK YOUR WEBMAIL, by entering HTTPS://www.YOURDOMAINNAME.com/WEBMAIL in the ADDRESS BAR of your browser.
If Squirrel Mail appears, and resolves to the URL: "http://web03.jubjub.net/WEBMAIL" (as shown in the screenshot below) then your site is hosted on WEB03, and requires different settings.
For those domains that use web03.jubjub.net settings, the INCOMING & OUTGOING MAIL SERVER HOST NAME SHOULD BE:
SET INCOMING MAIL SERVER HOST NAME to: web03.jubjub.net
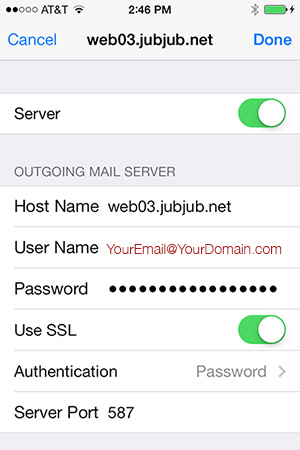
SET OUTGOING MAIL SERVER HOST NAME to: web03.jubjub.net
ON THE MAIN SETTINGS SCREEN, the INCOMING and OUTGOING Servers should be web03.jubjub.net:
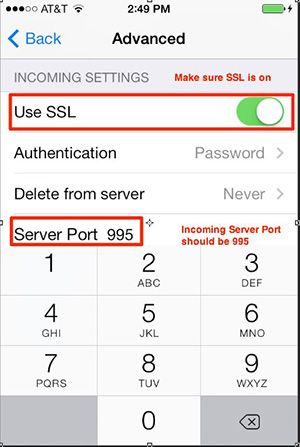
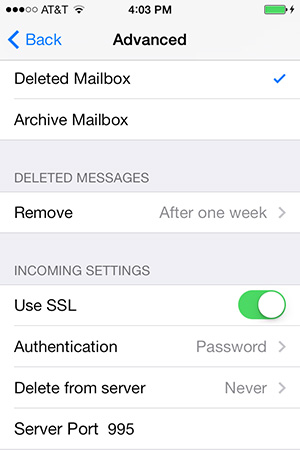
For those domains that use web03.jubjub.net settings, you will probably have to CLICK on the SMTP (OUTGOING) and the ADVANCED SETTINGS to UPDATE the PORT SETTINGS:
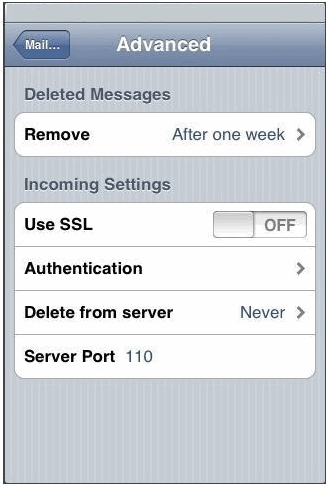
SET INCOMING PORT to 995: (click "this server requires an encrypted connection (SSL))SET OUTGOING PORT to 587: and click on TLS - if TLS not available, then choose AUTO
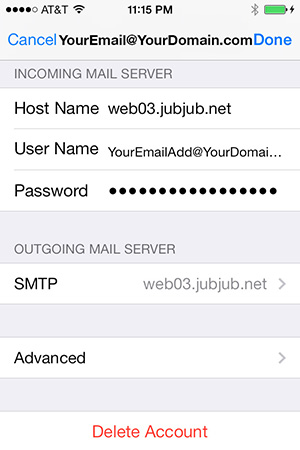
THE INCOMING SERVER SETTINGS SCREEN:
THE OUTGOING SERVER SETTINGS SCREEN:
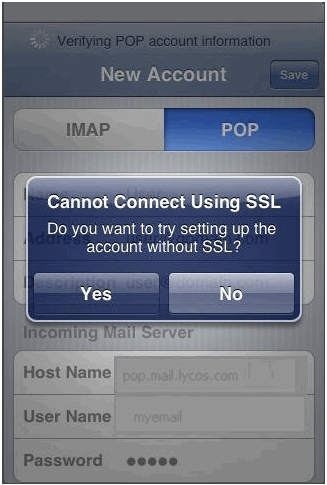
5. After entering the Server Settings, the iPhone will attempt to VERIFY the server settings. If you see a message that says "Cannot Connect Using SSL", click YES when asked to setup account without SSL. (***IF YOUR EMAIL is on WEB03, you will NOT see this message***)
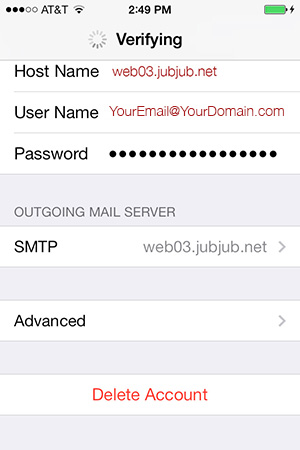
WEB03 HOSTED ACCOUNTS WILL SEE THE VERIFYING SCREEN, and then should SEE THE INCOMING SERVER SETTINGS SCREEN:
6. After verification, the incoming server settings for the account will be displayed, and should not need to be changed.
WEB03 HOSTED ACCOUNTS SHOULD SEE THESE SETTINGS. IF not, you'll have to go in and update them manually:
You're finished!
The steps above are sufficient for basic e-mail. You can check your e-mail to make sure it's working at this point: Press the Home button to return to the main screen, then click the Mail icon.
Your iPhone can now send and receive e-mail.
By the way, if you ever need to return to these screens and view or edit the settings of an existing account, you can tap Settings > Mail, Contacts, Calendars > address@example.com at any time.
Troubleshooting
After following these instructions, some people tell us they don't see some messages they expect, or that older messages disappear after they've seen them.
This will happen if you have another mail program checking the same mailbox, and the other program is set to delete messages immediately. Changing the settings on the other program to make it leave a copy of the messages on the servers will fix that.
